

How a Solar Mount Is Sealed
Ask a homeowner what worries them about solar and the answer is usually some version of the same sentence: you're going to put holes in my roof.
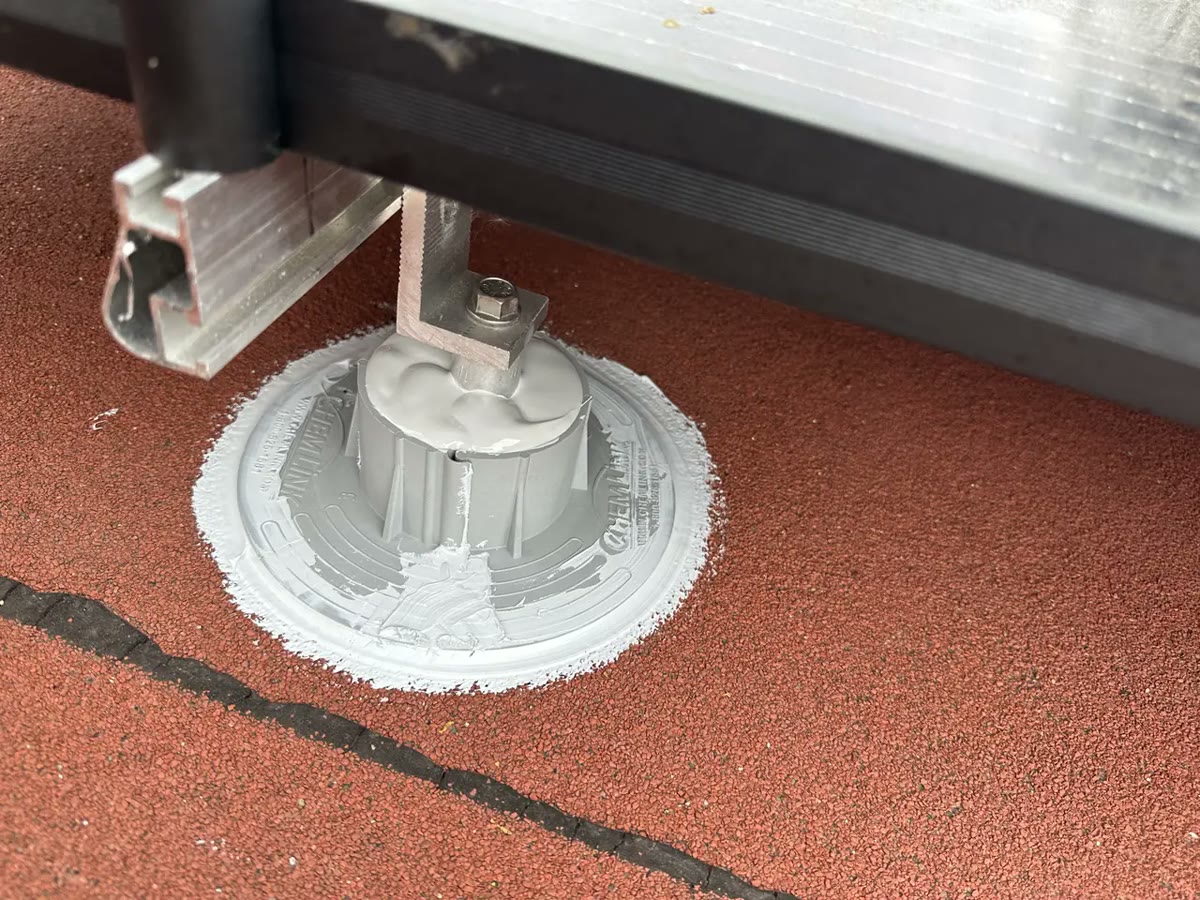
It is a fair thing to worry about, and it deserves a technical answer rather than a reassuring one. Most mechanically attached rooftop arrays do create penetrations — commonly a few dozen attachment points on a residential system, each one a hole through the covering into a rafter. The exact count is not arbitrary: it follows from the array size and the anchor-spacing limits set out below, which tighten sharply as the roof gets steeper. Ballasted systems on low-slope roofs and compatible seam-clamped systems on standing-seam metal can avoid penetrations altogether, but for the majority of Los Angeles roofs — asphalt shingle and tile — penetration is how the array is held down.
So the question is not whether there are holes. It is what happens at each one.
The code does address this — and then points somewhere else
There is a persistent claim in solar marketing that the building code is silent on solar attachments. It is not.
California Residential Code 2025, Section R329.4.3 is one sentence long:
Roof penetrations shall be flashed and sealed in accordance with Chapter 9.
That sends you to the roofing chapter, where the requirements are specific and dimensioned. Under R903.2, flashings must be installed so that moisture cannot enter the wall or roof through joints in copings, through moisture-permeable materials, or at intersections with parapet walls and other penetrations through the roof plane.
R903.2.1 then sets locations and materials:
- Flashing at wall and roof intersections, wherever there is a change in roof slope or direction, and around roof openings.
- A flashing to divert water away where the eave of a sloped roof meets a vertical sidewall — the kick-out.
- Where flashing is metal, it must be corrosion resistant, not less than 0.019 inch thick (No. 26 galvanized sheet).
Valleys have their own rules by covering. For clay and concrete tile, R905.3.9 requires valley flashing to extend not less than 11 inches from the centerline each way, with a splash diverter rib at least 1 inch high at the flow line; for asphalt shingle, R905.2.8.2 requires an open valley lined with metal to be at least 24 inches wide.
R903.2.2 adds crickets and saddles: any chimney or penetration more than 30 inches wide, measured perpendicular to the slope, needs one on its ridge side.
What the code does not specify — and why that matters
Read those requirements closely and something is missing. The code dimensions valley metal to the inch. It sets a minimum thickness for flashing sheet. It tells you when a penetration is wide enough to need a cricket.
It prescribes no specific detail for the individual solar mount fastener.
That is not an oversight so much as a scope boundary — R329.4.3 hands the question to Chapter 9's general flashing requirements and to the manufacturer's installation instructions, which the code makes binding under R907.3 and R329.3.1. But the practical consequence is real: within the same code, on the same street, two installers can seal the same mount in materially different ways and both be compliant.
This is the honest framing of the entire subject. The variation you find between solar installers on roof sealing is not mostly a variation in compliance. It is a variation in method, materials and care, inside a space the code leaves to the manufacturer and the workmanship.
Which is why it is worth understanding what the methods actually are.
Three generations of sealing practice
Sealant only. Thirty years ago, L-feet were commonly fastened straight to the roof and sealed with roofing cement or caulk. It is cheap and fast. It also fails, because sealant is a consumable: it is exposed to ultraviolet light and thermal cycling, it becomes brittle, and the joint it protects moves. Every serious voice in roofing now treats sealant-alone as inadequate. The National Roofing Contractors Association takes the harder line — in NRCA's terms, sealant by itself is not to be trusted, and neither are exposed fasteners.
Mechanical flashing. The industry's answer through the 2000s and 2010s: a metal flashing plate slipped under the course of shingles above the penetration, so water sheds over the top of it rather than relying on any adhesive. This is the approach most roofers will recognize and most manufacturers specify. Its cost is disruption — shingles must be lifted, sometimes broken, and the array's layout becomes constrained by the courses.
Minimal or "chemical" flashing. The current generation, exemplified by products like QuickBOLT: the lag goes through the shingle into the rafter, combined with a compact microflashing and a sealant reservoir designed into the mount. The installer fills the reservoir after the lag is driven, and sealant is extruded through vents until it expels — deliberately over-filling the void around the shank.
The best practice across all three is the same in one respect: sealant goes into the pilot hole before the lag is driven, so the shank carries it down the bore rather than sitting on top of a dry hole.
Materials matter too, and there is no single right answer here. MS polymer, silicone and butyl are all in current use, alongside tripolymer and polyurethane formulations. The trade's own position is that no one sealant suits every job — the appropriate choice depends on the authority having jurisdiction, the temperature range and the moisture exposure at the installation. What does not vary is the requirement that the product be UV-stable and remain flexible: a sealant chosen on price, in a location where it will be exposed, is the component most likely to fail first.
A useful piece of NRCA vocabulary, because it reframes the anxiety: to a roofer, a penetration means a skylight, a plumbing vent, a conduit — something that interrupts the roof plane and needs a flashed assembly around it. A fastener is not in that category. That distinction is not a dismissal of the risk; it is a statement about scale. A properly flashed 5/16-inch lag is a different class of object from a chimney.
Where the fastener has to land
Sealing is only half of it. The other half is what the fastener grips.
California's model expedited checklist uses rafter embedment as its default prescriptive route: 5/16-inch lag screws with 2.5-inch embedment into the rafter, or a fastener meeting the mount manufacturer's own published guidelines. On that route, embedment is measured into the framing member, not into the sheathing.
That is not the only permitted approach. Some listed mounting systems permit engineered direct-to-deck attachment when installed under their tested specifications and manufacturer instructions — GAF's own bulletin on solar over its shingle roofs notes that some systems attach to the deck and others to rafters. What matters is that the attachment is the one the system was listed and tested for, and that the installation follows those instructions, which the code makes binding under R907.3 and R329.3.1.
Where the design does rely on rafter embedment, missing the rafter is a structural failure whether or not the penetration is sealed well — and one that may not be visible from the ground for years. Locating rafters accurately, and hitting them, is craft work. It is also why the anchor layout plan is one of the documents the state's checklist asks to see. We cover the structural side of this in detail on Can Your Roof Carry Solar Panels?.
By roof type
Asphalt shingle. The most common case. A flashing plate is worked under the course above, the lag is driven into the rafter through a pre-sealed pilot hole, and the shingle above is re-seated. Done properly, water sheds over the flashing exactly as it sheds over any other layer. Done poorly — flashing sitting on top of the shingle instead of under it, or a lag driven without sealant — it becomes a slow leak that surfaces years later.
Tile. The most demanding of the four to work on. Tile must be lifted, a base flashing or tile hook installed to the deck, and the tile re-laid or replaced with a purpose-made flashing pan. Broken tiles must be replaced, not re-used — the code makes the same point about reinstallation in R908.5, where damaged, cracked or broken tile is expressly excluded from reuse. Tile work also demands walking the roof without breaking more of it, which is a skill in itself.
Flat and low-slope. Two paths: ballasted racking that penetrates nothing, or mechanically attached racking with a properly flashed curb at each penetration. On a warranted membrane, the attachment method is governed by the warranty's own approved details, materials and applicator requirements — read that document before choosing. See Solar on Flat and Low-Slope Roofs.
Standing-seam metal. The exception on a pitched roof: seam clamps grip the standing seam itself, and where the seam profile, clamp system and manufacturer requirements all line up, nothing pierces the covering. See Standing-Seam Metal Roofs and Solar.
What to ask before the work starts
Four questions, and any competent installer will have immediate answers:
- Which flashing product is being used on this roof, by name? "We flash everything" is not an answer. The product determines the method.
- Is the flashing seated under the course above, or surface-mounted? For shingle roofs, this single detail separates a 25-year mount from a warranty argument.
- What is the fastener, what does it attach to, and to which listing? You are listening for a specific diameter and depth, and for a clear statement of whether the system is designed for rafter embedment or for engineered direct-to-deck attachment under its own tested specification — not for vagueness about "the structure."
- Who warrants the penetrations, for how long, and what happens if it leaks in year twelve? This is a different question from the panel warranty and the shingle warranty — three separate instruments, held by three different parties. We cover how they interact in Three Warranties, One Leak.
When a roof does leak after a solar installation, the cause is usually specific and local: a particular penetration sealed badly, a fastener that missed the framing it was meant to reach, or a flashing laid on top of a shingle instead of under it. Those are decisions made in an afternoon by a person on a roof — which is why the choice of installer matters at least as much here as the choice of panel.
Code references
Sections cited above, for readers who want to verify them directly in the code text.
- California Residential Code 2025 (Title 24, Part 2.5), Section R329.4.3 — roof penetrations shall be flashed and sealed in accordance with Chapter 9.
- California Residential Code 2025, R903.2, R903.2.1, R903.2.2, R905.2.8.2, R905.3.9 — flashing requirements, locations, metal thickness (0.019 in.), crickets and saddles above 30 in., shingle open-valley width (24 in.) and tile valley flashing (11 in. each way, 1 in. splash diverter).
- California Residential Code 2025, R907.3, R329.3.1 — installation per manufacturer's instructions; UL 2703 mounting system listings.
- California Residential Code 2025, R908.5 — reinstallation of existing tile permitted except damaged, cracked or broken pieces.
- National Roofing Contractors Association — position on sealant-only attachment and exposed fasteners.
- GAF Technical Bulletin R-131, Installation of Solar PV Panels Over A GAF Shingle Roof.
- Solar Power World, Manufacturers transition to minimal-flashing solar roof mounts (2020) — evolution of mount sealing practice.
Frequently asked
How many holes do solar panels put in a roof?
Will solar panels make my roof leak?
How are the holes sealed?
What if it leaks in ten years?
Does flashing damage the roof covering?
Related reading
Sources & methodology
Figures on this page come from the primary sources below and, where noted, from Cali Energy calculations using the stated assumptions. Rates, incentives, and program terms change; each was verified September 1, 2026.
Already have an array on your roof?
If you want a second opinion on how it was attached, we can inspect the existing mounts — how the flashing is seated, what the fastener is and how deep it goes, and the condition of the sealant — and tell you what we find.
Prepared by Cali Energy, September 1, 2026. This article is for general educational purposes only and is not legal, tax, financial, engineering, or utility advice. Rates, incentives, codes, permit requirements, equipment specifications, prices, and program terms may change; figures and timelines are estimates, not guarantees. Confirm current requirements with the applicable utility, AHJ, program administrator, manufacturer, or a licensed professional. See our Content Disclaimer. Cali Energy · 19201 Parthenia St, Unit E, Northridge, CA 91324 · CSLB #1032379 (B, C-10, C-39)