

From Address to Proposal PDF: One Cali-Graf Calculation, Step by Step
In Cali-Graf — the free solar design and proposal app built by Cali Energy, a Los Angeles solar and roofing contractor — one calculation turns one address into a customer proposal in eight steps: start a calculation, find the home, trace the roof, enter the usage, choose the equipment, set the price, calculate and save the PDF. This walkthrough follows the fictional demo home from Cali-Graf's in-app tutorial — an LADWP home in Zone 2 — and explains what each step decides and how it moves the final numbers. The exact clicks for each step are in Cali-Graf's guide to making your first calculation.
The demo home at a glance
Cali-Graf publishes this calculation as a worked example. The inputs are the tutorial's; the $3.10 per watt is an example input entered by the seller, not a quoted price.
| Demo home | |
|---|---|
| Utility and zone | LADWP, Zone 2 |
| Yearly usage | 9,600 kWh |
| System | 22 panels, 9.46 kW DC |
| Battery | 2 × Enphase IQ Battery 5P, 9.5 kWh usable |
| Price (example input) | $3.10 per watt, cash |
| Electric bill today | $3,106 a year |
| Bill with solar, year one | $145 a year |
| First-year savings | $2,961 (−95%) |
| Solar covers | 140% of usage |
| Payback from bill savings | 11.9 years |
| Net savings over 25 years | $69,029 |
The last line of the result matters as much as the savings: at 140% coverage the calculator warns that about $955 of credit is left over after year one (October 2026 rates) and that roughly 6 panels could come off with little loss in savings. Step 7 explains why.
Step 1 — Sign in and start a calculation
You sign in with a Google account — there is no separate password — and press New calculation. In Cali-Graf, one calculation is one home: it holds the address, the roof, the usage, the equipment, the price, the results and every proposal made from it. Its status shows how far it got — New, Address, Roof drawn, Calculated, Proposal — and work saves as you go, so a seller can start at the office and continue at the customer's home on a phone or tablet.
Why it matters: once a roof is drawn, searching a different address asks whether to start a new calculation. A roof design always stays tied to the home it was drawn on.
Step 2 — Find the home: the address sets the utility, zone and weather
In Los Angeles County, typing the house number and the first letters of the street drops down matching addresses from the county's address points; anywhere else, Find places the address through Google. Cali-Graf then loads the roof from Google Solar and shows, under the address, the utility and its rate details — for the demo home, LADWP · Zone 2 — along with the city, ZIP and the date of the aerial photo.
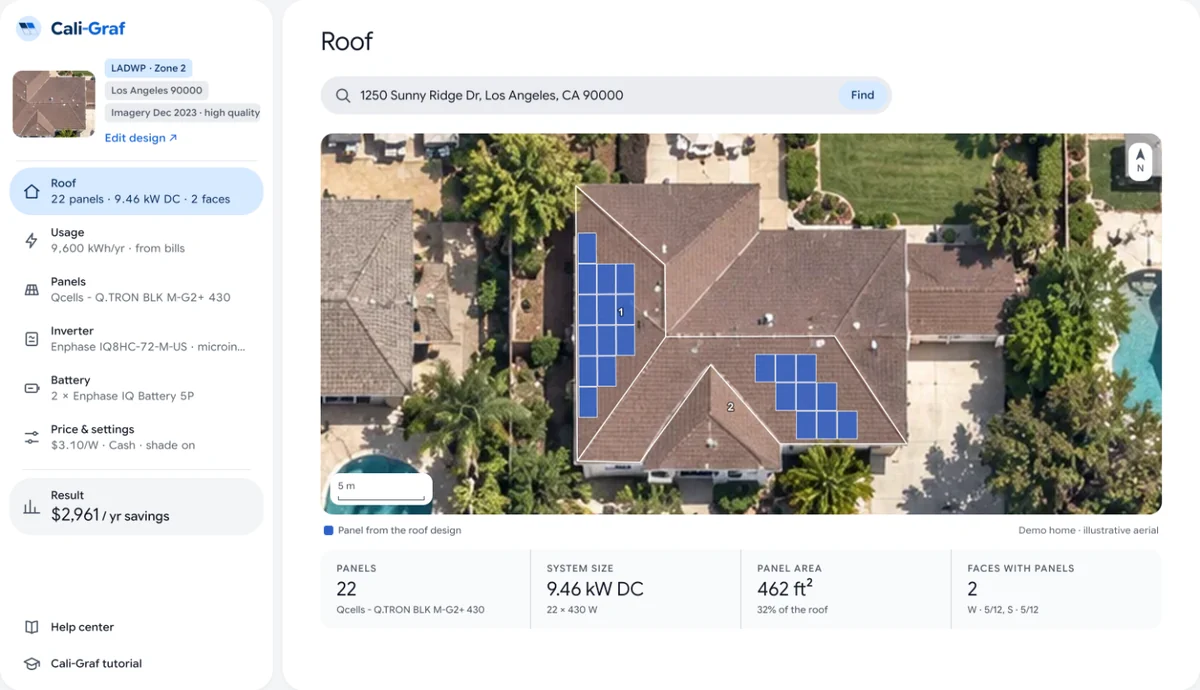
Why it matters: everything downstream starts here. The same usage produces a different bill in a different LADWP zone, SCE baseline region or city, so the line under the address is the first thing to check against the customer's bill. Cali-Graf finds the utility from California Energy Commission service-area maps plus the ZIP and city, and gets it right for 99% of homes; homes right on the LADWP–SCE line deserve a second look.
Step 3 — Trace the roof and fill it with panels
Design roof ↗ opens the roof editor on Google aerial imagery. You click the corners of each roof face, and Cali-Graf measures each face's pitch and direction from Google's 3D height data. California or City of Los Angeles fire setbacks are drawn on the roof, and obstacles such as chimneys, vents and skylights are marked.
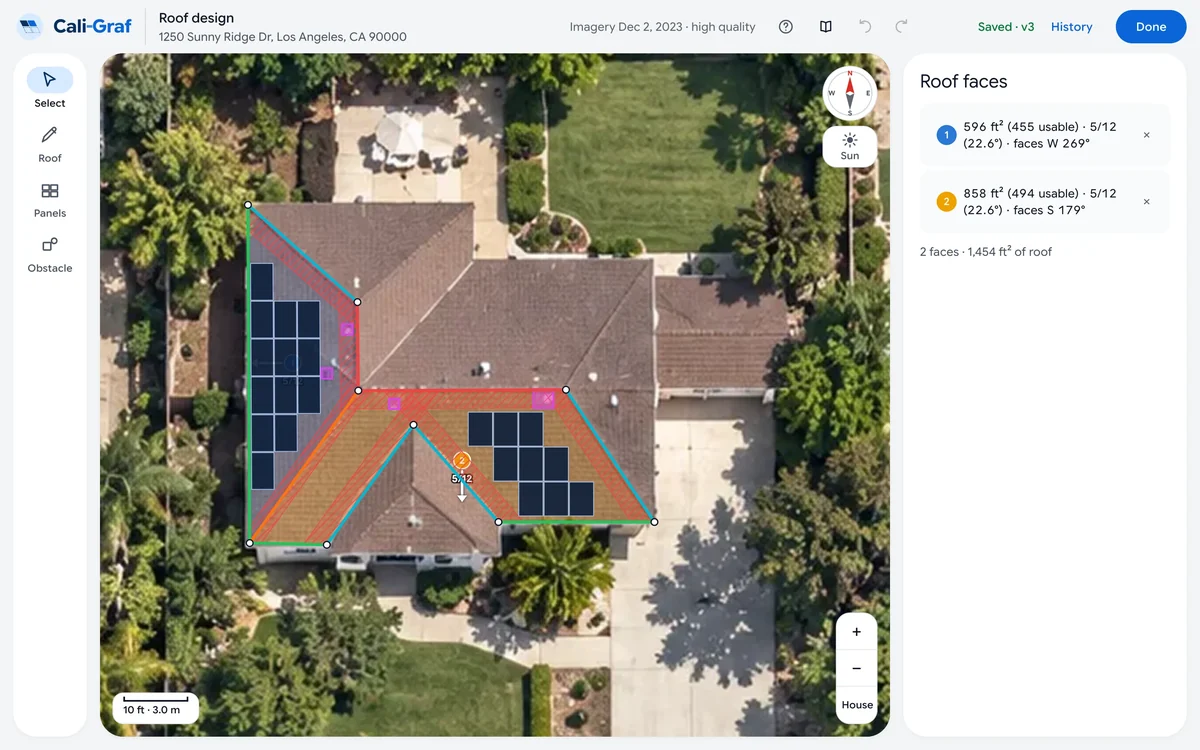
Then Fill roof places as many panels as fit on every face that doesn't face north, keeping out of setbacks and away from obstacles. On the demo home the result card reads 22 panels · 9.46 kW DC · 32% of the roof. North faces are skipped unless you fill them one by one.
Why it matters: the layout sits on measured faces rather than a guess from a flat picture, and production is later calculated panel by panel on those faces. The measurement does not replace a site visit — it makes the first design, and the first proposal, start from real geometry. For how much roof a typical system needs, see our guide on whether solar can power a whole house.
Step 4 — Enter usage the way the utility bills
Usage offers three ways in: Bills (six two-month bills for LADWP, twelve monthly bills for SCE), a Yearly total, or a Green Button file with hourly usage downloaded from the utility's website. Cali-Graf's guide labels bills the most accurate of the three. The demo home uses 9,600 kWh a year.
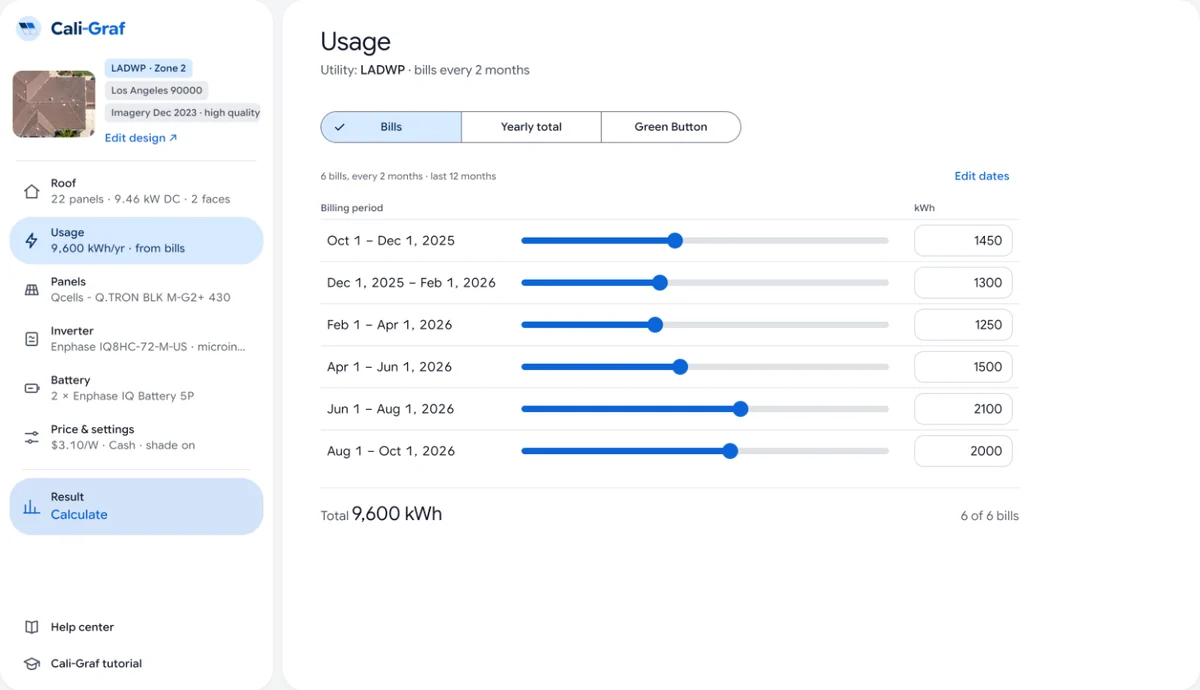
Why it matters: the savings depend on when the home uses power, not only how much. Bills capture the shape of the customer's year — an air-conditioned summer against a mild winter — and for an LADWP home the solar is netted against usage inside each two-month period. If the customer has less than a year of history, a yearly-total estimate is the fallback. For reading the bill itself, see how to read your electric bill in California.
Step 5 — Choose the inverter and, if needed, a battery
The panel comes from the roof editor. In Inverter you pick the exact model — a microinverter such as Enphase IQ8, a string inverter, or a hybrid such as Tesla Powerwall 3 — and models that fit the panel are marked as working with it. Until you choose, Cali-Graf uses a generic 96% inverter for a first estimate, but the proposal requires the exact model. In Battery you pick a model, 1 to 4 units and an operating mode; the demo home has two Enphase IQ Battery 5P units, 9.5 kWh usable. A green mark means the panel, inverter and battery work together.
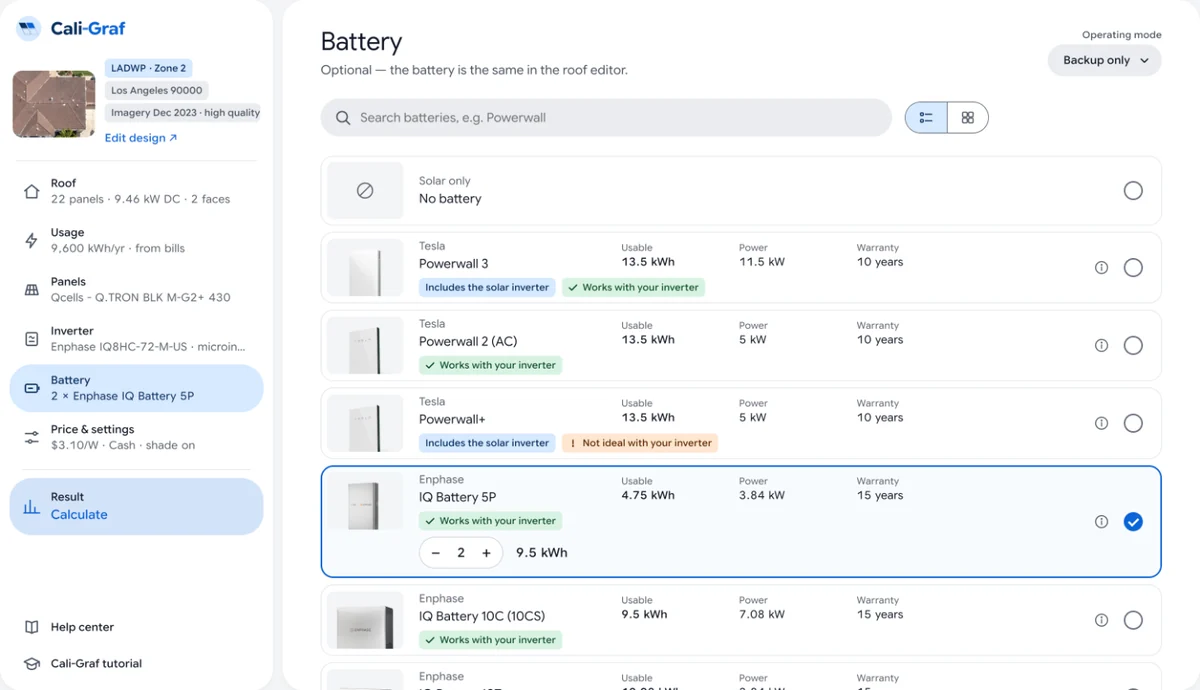
Why it matters: the inverter's efficiency and power limit change yearly production a little, and the proposal lists equipment by name. For an LADWP home the battery is a separate question: because LADWP credits exported solar one to one within each billing period, storing solar usually doesn't change the bill, and Cali-Graf says plainly when a battery's value is backup power rather than savings. The battery operating modes guide explains the choice.
Step 6 — Set the price
In Price & settings the seller types the solar price in dollars per watt; Cali-Graf multiplies it by the system size and shows the result as you type — for the demo home, $29,326 for 9.46 kW DC at the example input of $3.10 per watt. Battery price and extras such as a main panel upgrade are added on separate lines, and Total system cost adds them up. This is also where the seller chooses how the customer pays and types the customer's name for the proposal cover.
Why it matters: the total feeds payback, the 25-year savings and the proposal's price page, and it follows the roof — add or remove panels and the price changes with the system size. Cali-Graf does not subtract a federal tax credit; for why, see the end of the 30% solar tax credit.
Step 7 — Calculate and read the result
Calculate models production for every hour of the year — a typical weather year from the National Solar Radiation Database, the sun's path on each roof face and Google's shade data at each panel — and then applies the utility's rates and net metering rules. The first run for a new home takes up to about half a minute while the shade data downloads.
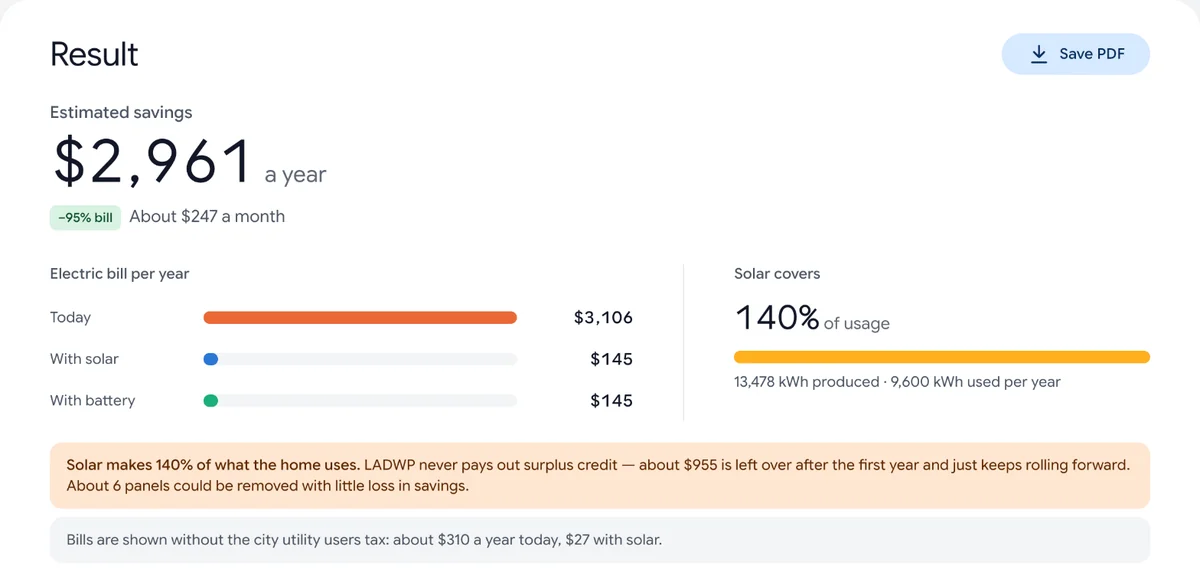
The result leads with estimated savings, the electric bill today and with solar, how much of the home's usage the panels cover, and the system cost and payback. Below them sit charts (bills, energy, 25 years) and every number by billing period.
Why it matters — the oversizing warning: under LADWP net metering, surplus solar becomes a dollar credit that rolls forward to later bills and is never paid out. A system that covers 140% of usage earns credit it can never spend. Cali-Graf shows the credit left after year one — about $955 on the demo home at October 2026 rates — and how many panels could come off with little loss in savings, before the customer pays for extra panels. How LADWP's tiers, zones and credit work is set out on Cali-Graf's LADWP solar bill explained page and in our guide to LADWP net metering in 2026.
If anything changes after calculating, the Result row on the left shows Inputs changed — update: the proposal always uses the latest calculation.
Step 8 — Save the proposal PDF
Save PDF builds the customer proposal in about 20 to 30 seconds. It needs an up-to-date calculation, an exact inverter, a solar price, an amount on every extra and, for a loan, the financed amount from the lender's quote. The seller's business card — name, company, license, phone and email — goes on the cover, the footer of every sheet and the signature line.
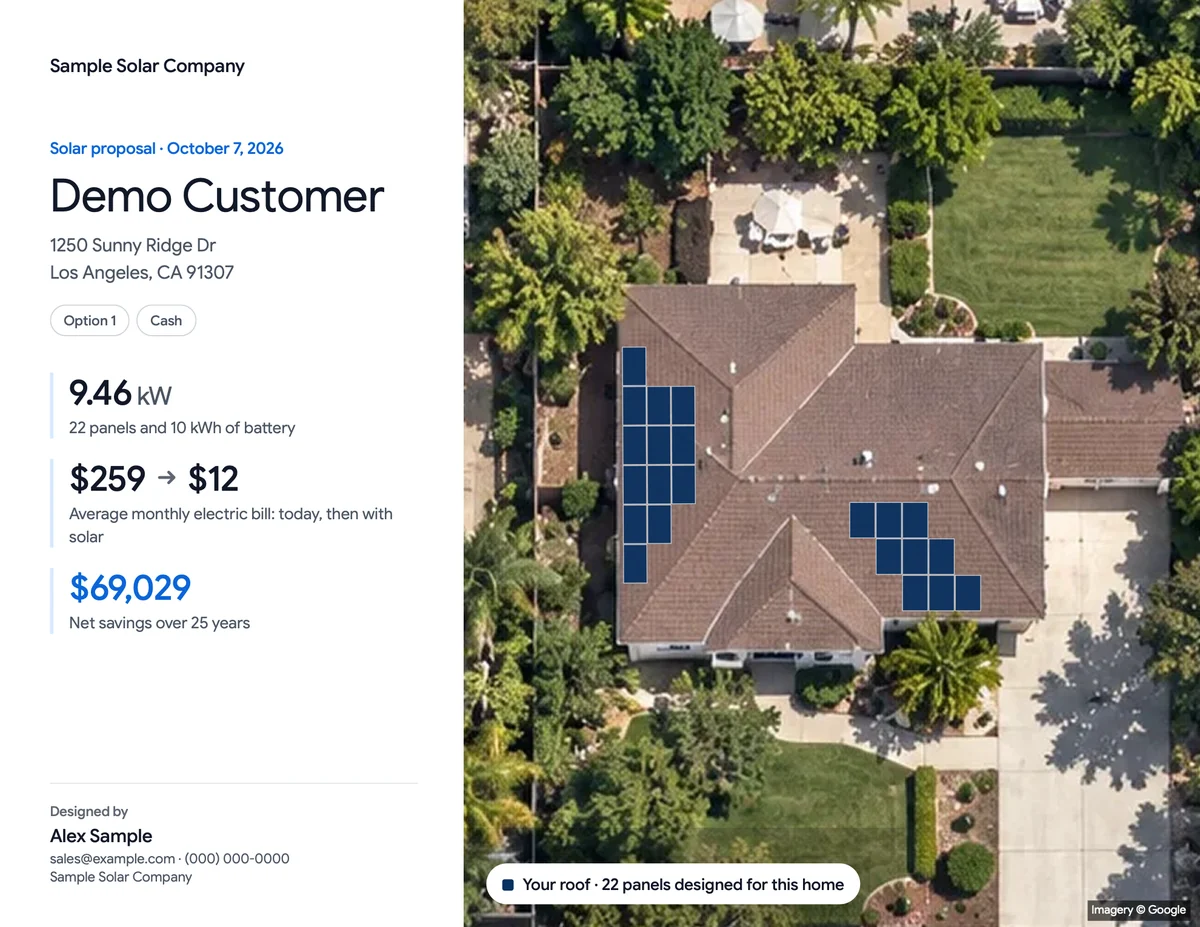
| Sheet | What the customer sees |
|---|---|
| Cover | The monthly electric bill today and with solar (or bill plus loan payment), the system in one line, the seller's contact details |
| Your solar system | Roof design, system size, first-year production, share of usage covered, equipment, energy by month |
| Your battery | Only with a battery: how it works in the chosen mode, backup during outages, extra savings |
| Your savings | Only when usage is entered: bills without and with solar month by month, and over 25 years |
| Price and approval | The price line by line, how the customer pays, what is included, approval and signature |
| Your right to cancel | The notice the Contractors State License Board requires |
Why it matters: the homeowner decides on a few numbers — what they pay today, what they would pay with solar and what the system costs — and the proposal puts those first. Every number is still an estimate, so Cali-Graf's guidance is to check the roof design, the usage and the price before the customer sees them. The full sample proposal for the demo home is public.
After the PDF: the job stays in your list
Every home becomes a row in Calculations, the first screen after sign-in, with the customer's name, the utility, the system size and a status that moves on its own — New, Address, Roof drawn, Calculated, Proposal — so the list doubles as a simple pipeline. Search finds a job by address, city or customer name. Make a copy creates the next option for the same customer (Option 2, Option 3) with the roof, usage and price already in, so a battery or a smaller system is one change away; deleted calculations wait 30 days in Trash. A seller who quotes the same price per watt most days can save it once as the default for new calculations. Details: Find and organize calculations.
Try the same path without a customer
The same calculation is built into Cali-Graf as an interactive tour. Cali-Graf tutorial, at the bottom of the left column, creates the demo home and walks through six parts — find the home, draw the roof, obstacles, panels, usage and price, results and proposal — in about five minutes. Cards marked Your turn wait for you to press the real buttons; at the end the demo calculation is removed, and real calculations are never touched. On a real lead, the first three steps can be done before the appointment — see pre-qualifying a solar lead from the address — and a manager can build a new rep's first week around this path with the onboarding plan.
Follow along in the app: the in-app tour builds this demo home for you step by step.
The demo is a typical, made-up LADWP home; a real customer's usage, rates and roof set their own numbers, and the roof is confirmed on site before the job is built. The bigger picture of the platform is in what Cali-Graf is.
Frequently asked
How long does a Cali-Graf calculation take?
Can I try Cali-Graf without a real customer?
Why does Cali-Graf need the exact inverter before making a PDF?
Why doesn't a battery lower the demo home's LADWP bill much?
What does the oversizing warning mean?
Does Cali-Graf subtract the federal solar tax credit?
Related reading
Sources & methodology
Product facts on this page come from Cali-Graf's own help center and the pages linked below; figures in examples come from the stated inputs. Features, limits and supported utilities change; each was verified October 16, 2026.
- Cali-Graf Help — Make your first calculation
- Cali-Graf Help — Start a new calculation
- Cali-Graf Help — Find the customer's house
- Cali-Graf Help — Utility, rate zone and baseline region
- Cali-Graf Help — Fill the roof with panels
- Cali-Graf Help — Enter the bills
- Cali-Graf Help — Choose the inverter
- Cali-Graf Help — Add a battery
- Cali-Graf Help — Set the system price
- Cali-Graf Help — Read the results
- Cali-Graf Help — Create the proposal PDF
- Cali-Graf Help — Take the in-app tour
- Cali-Graf — LADWP solar bill explained (worked example)
- Cali-Graf — Sample proposal (demo home)
- California Energy Commission — Electric Load Serving Entities (service-area map)
- NLR (formerly NREL) — National Solar Radiation Database
- California Energy Commission — Solar Equipment Lists
- IRS — Residential Clean Energy Credit
Run the same eight steps on a real customer
Take the five-minute tour on the demo home, then do your next customer the same way: roof, usage, equipment, price, proposal. Free for solar professionals.
Prepared by Cali Energy, October 16, 2026. This article is for general educational purposes only and is not legal, tax, financial, engineering, or utility advice. Rates, incentives, codes, permit requirements, equipment specifications, prices, and program terms may change; figures and timelines are estimates, not guarantees. Confirm current requirements with the applicable utility, AHJ, program administrator, manufacturer, or a licensed professional. See our Content Disclaimer. Cali Energy · 19201 Parthenia St, Unit E, Northridge, CA 91324 · CSLB #1032379 (B, C-10, C-39)